Orca Quick Start (App)#
This tutorial will give you a quick walk through of how to create a labeled memoryset and configure a retrieval-augmented classification model that uses those memories to guide its predictions.
Getting Started#
Once your organization’s administrator has given you access to your organization’s application, visit the OrcaApp login page and log in with your work email and password. For more information on how to get access to the OrcaApp, see the Accounts guide.
Dashboard#
Upon logging in, you should see dashboards tracking several critical metrics along with several menu options on the left side. These metrics reflect the number of predictions your organization’s Orca-enabled models made and the number of new memories created for your organization.
Classification Model Predictions Diagram
On the homepage you will see the total number of predictions your Orca supported models have made in a production environment in the current month-to-date and the last two months.
You will also see the total count of models (defined as unique memory-augmented models paired with a memoryset).
Memories Created Diagram
Each time you add new information into a memoryset or build a new memoryset, you create new memories that are available to the model. The lower diagram on your homepage shows the total number of memories created for the current month-to-date and the previous two months.
Memory counts will be higher in months when you insert more information into your models’ memorysets (e.g. you create a new memoryset to power a new application or provide many new examples to customize an existing model for a new enterprise customer).
Create a Memoryset#
Now that you understand some core concepts about Orca, let’s get started with building your first memory-augmented model.
Upload a Datasource
Orca models need data in order to make their inferences. After this data is converted into embeddings we call it a memoryset. In order to create a memoryset, you first need to upload what we call a datasource.
Think of datasources as labeled examples of the inputs and expected outputs from your model. They are structurally similar to training data used with traditional deep learning models, but Orca allows you to start with substantially smaller amounts of initial data (as few as 3-5 examples per class) in order to develop a working model.
You can add a new datasource by visiting the “Datasources” page listed in the menu on the left rail. This page will show you any datasources previously added, and you can add new data by clicking the “+ Create” button located in the upper right.
SDK
You may also use the SDK to upload datasources. Please consult Orca’s technical documentation for more information on taking this step.
Datasource Requirements
Datasources must meet certain requirements in order to be converted to a memoryset:
- Datasources must include numeric labels in one column. You can also include additional labels as well, but a memoryset requires at least one numeric option.
- Label values must begin with 0 and be contiguous.
- Examples for each class. Ideally you can include 3-5 examples, but more examples are usually needed for production grade models.
- Files uploaded via the UI need to be in one of the following formats: CSV, JSON array of objects, JSON object with arrays, JSONL, or Parquet
- Total upload size cannot exceed 100MB (larger datasources can be uploaded via the SDK. Please consult Orca’s technical documentation for more information on taking this step.)
You can include other columns within the datasource, but it must include these criteria.
You will also need to add a unique name for the datasource that uses only alphanumeric and underscore characters. Adding a description of the datasource also supports Orca’s agentic tools helping guide you with model tuning.
Once data is loaded into Orca, you should see it populated in the datasource in the “Data” tab, also located here.
Each datasource uploaded to Orca can be downloaded or deleted if it is no longer necessary. You can also upload different versions of the datasource for later experimentation to see if adding additional information (or removing it) to the memoryset changes the model’s accuracy or performance.
Create a Memoryset
After selecting the “Memoryset” option in the navigation menu, you will be able to create a new memoryset within the OrcaApp from the upper right-hand corner.
If you look in the top right of the Memorysets page, you should see a button labeled “Create.” By clicking on that button you will open a new screen. On this page, you will see two tabs at the top of the page:
- Labeled allows you to create labeled memorysets for classification models. The list is populated with all datasources that contain integer or enum columns.
- Scored allows you to create scored memorysets for regression models. The list is populated with all datasources that contain integer or float columns.
You should see all of the datasources you have previously uploaded into Orca and meet the necessary criteria for becoming a Labeled or Scored memoryset. To create a memoryset:
- Give your memoryset a unique name. Alphanumeric characters and underscores are allowed.
- Select the appropriate tab for the type of memoryset - Labeled or Scored.
- Provide a short description of the memoryset so that Orca’s agentic flows can assist with making updates and changes to your memoryset in the future.
- Select a datasource from the available list. If you don’t see your preferred datasource, please verify that it was correctly uploaded via the SDK.
- Select the relevant column names from your datasource. For labeled memories “value” and “label” columns are required. “Source ID” is optional so that you can reference your initial datasource.
Select an Embedding Model
When creating a memoryset from a datasource, you must select an embedding model as part of the workflow. The choice of embedding model has a large impact on how accurate your predictions are. To help guide your selection, you can evaluate how accurate different embedding models will be when creating a memoryset. You can evaluate as many models as you would like, but it will take longer to get results if you select more models. Orca will subsample your datasource to get a directional estimate of embedding accuracy (with higher percentages indicating better performance).
Generally, Orca recommends starting with “GTE_BASE” in your evaluations- this model usually builds effective embeddings that drive model accuracy and typically does this relatively quickly (depending on the size of your datasource). Different embedding models will yield different results, and you may see changes when you expand to the full dataset. We encourage experimentation to find the best model for your use case and to validate the embedding model evaluations’ findings. Orca currently supports 4 standard, pretrained embedding models:
| Name | Specs | Considerations |
|---|---|---|
| GTE_BASE | 768 embedding dimensions, 8,192 max token length | Recommended starting point when testing an embedding model due to high accuracy, low latency to create embeddings. |
| CDE_SMALL | 768 embedding dimensions, 512 max token length | |
| DISTILBERT | 1536 dimensions, 512 max token length | |
| GTE_SMALL | 384 dimensions, 512 max token length | Small and fast. Works well for rapid experimentation or on large uncomplicated datasets |
We also have additional pre-trained models that are instruction-tuned. By selecting them in the OrcaApp, you leverage the pre-vetted instructions from Orca. Additionally, these models can accept custom instructions via functionality available in Orca’s SDK. These custom instructions will influence how the selected embedding model creates the embeddings. Leveraging these models effectively requires a clear articulation of the task you are building this model to complete, as unclear instructions can degrade performance.
| Name | Specs |
|---|---|
| MXBAI_LARGE | 1,024 embedding dimensions, 512 max token length |
| E5_LARGE | 1,024 dimensions, 514 max token length |
| BGE_BASE | 768 dimensions, 512 max token length |
| GIST_LARGE | 1,024 dimensions, 512 max token length |
Finetuning an Embedding Model
Later, we’ll also discuss how you can finetune an embedding model for your specific data and why you might look to do this.
Once you have selected your embedding model, you’re ready to create the memoryset. Just hit the “Submit” button in the lower right corner of your screen.
Build a Classification Model#
Once you have a memoryset built in Orca, you can build a predictive AI model. Select the “Classification” option in your left-side menu to go to the Classification Models page. In the top right corner of this tab, you should see another “CREATE” button. Selecting that button will open the following screen:
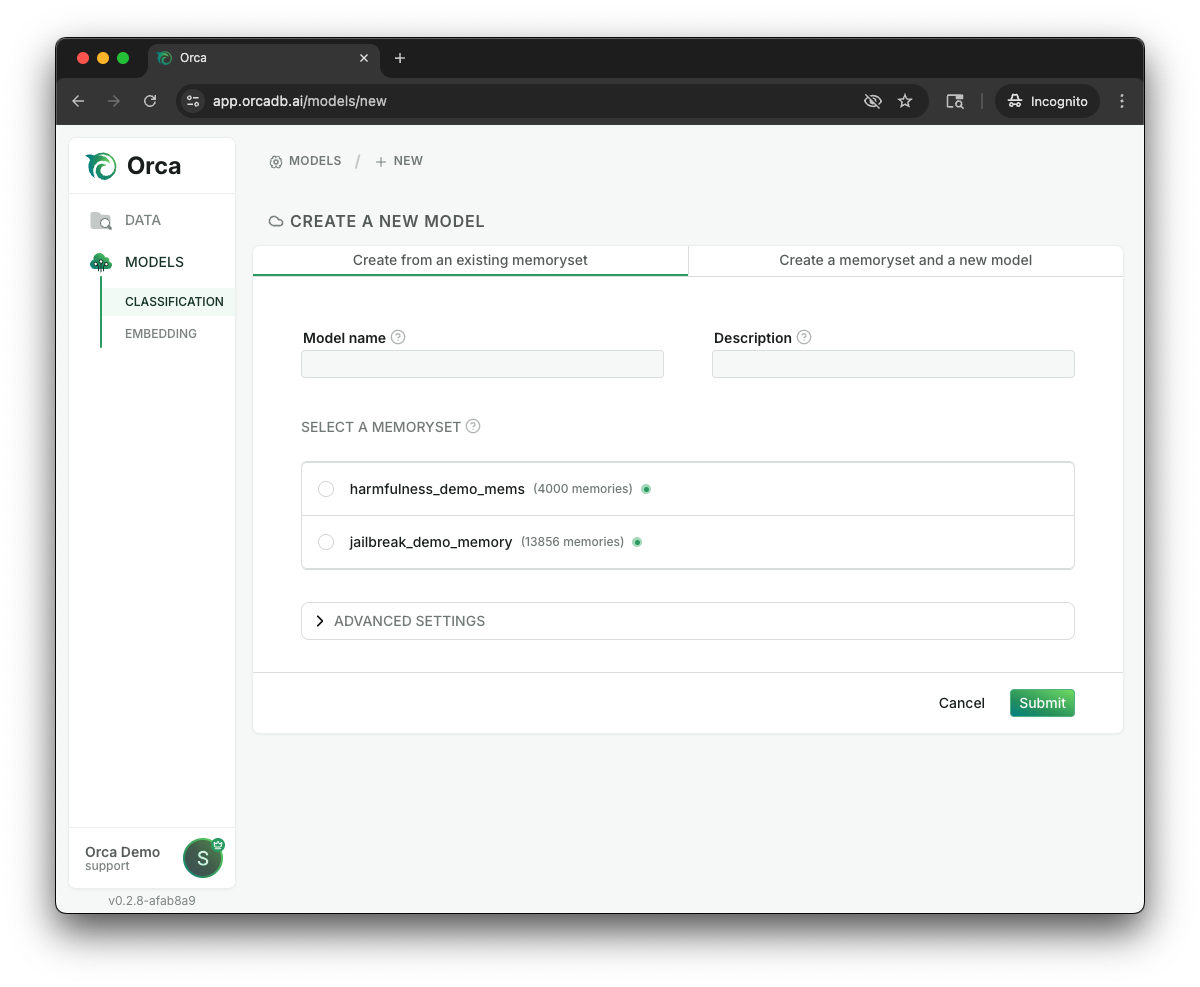
Within this section, you should provide the following items:
- Name your model with alphanumeric characters and underscores so you can locate it later, including directing API calls to this specific model.
- Provide a short description of the model and its tasks, so that Orca’s agentic flows can assist with making updates and changes to your memorysets or offer explanations on how a model reached a specific prediction.
- Select a labeled memoryset (likely the one you just created) from the available list. If you don’t see your preferred memoryset or you haven’t created one yet, you can select “Create a memoryset and a new model” to allow you to create a memoryset at the same time as your model.
Models and memorysets do not form exclusive pairs - multiple models can be built on the same memoryset, which is a powerful tool when creating customized AIs for multiple users. However, when editing a memoryset, edits impact all models using that memoryset.
Once you have completed these steps, you can click the green “Submit” button. Congratulations! You’ve just built your first model with Orca.
Test your Classification Model#
You can use the OrcaApp to manually test how your new model performs for specific predictions. Based on your findings, you can audit the prediction, evolve your memoryset (changing labels, adding new examples to the memoryset), or troubleshoot your model.
While looking at the “Classification” tab of the OrcaApp, you can click the “Try out the Model” icon, shown below:
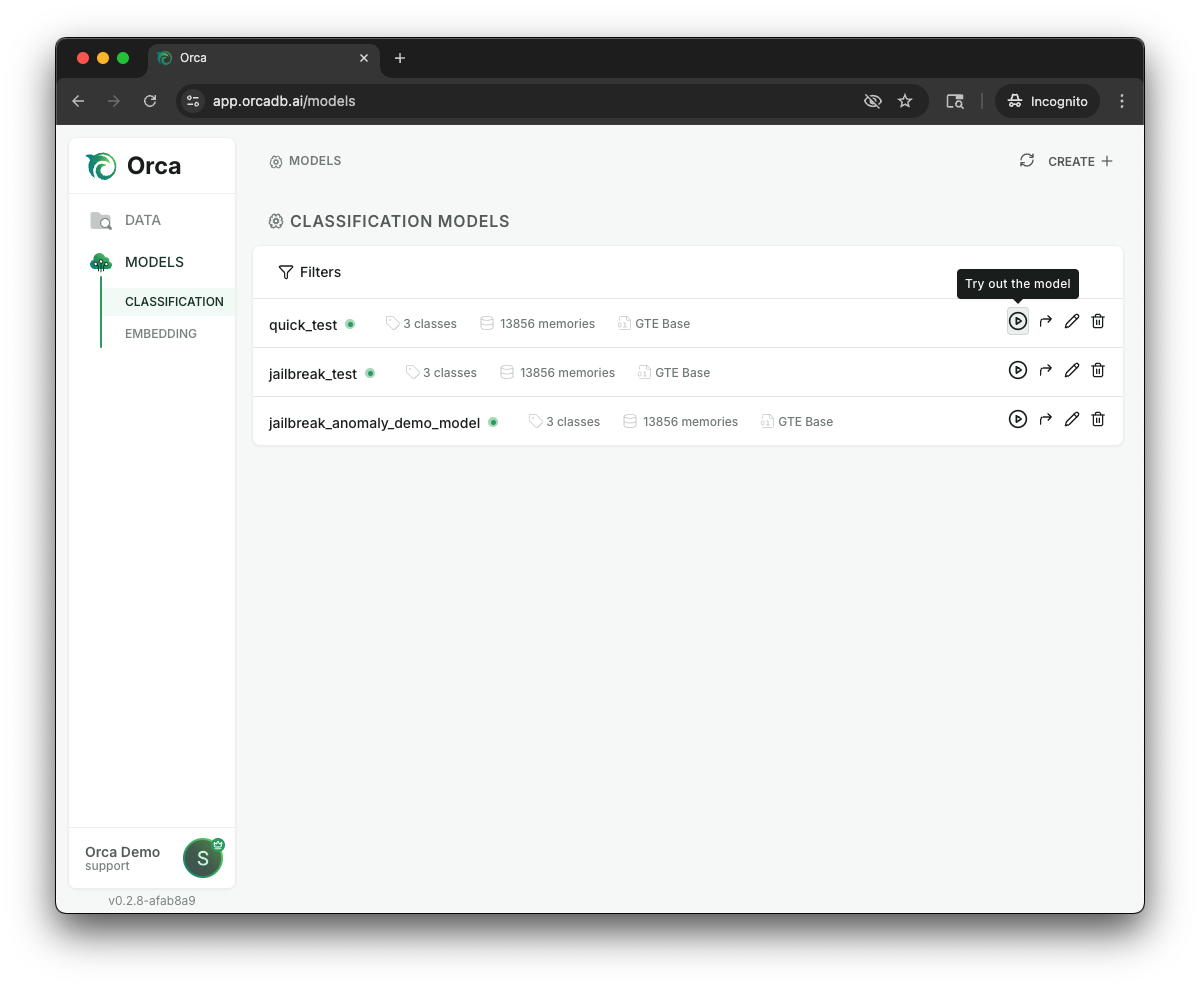
Upon clicking that icon, you will be able to enter sample queries and see the model’s prediction in response to that input. You will get better insights when your queries are structurally similar to the examples you expect in production (and hopefully have the same structure as your memories). For example, this jailbreak demo works best when you enter inputs that look like chat prompts to an LLM.
Queries entered here will be sent to the model for prediction. The prediction result will return a predicted “label” and “label name.” We can also see the following metrics:
- Confidence is a relative measure between 0 and 1.0 that reflects how closely the memories used to make the prediction correlate with the query. Higher numbers represent higher correlation.
- Anomaly Score represents how much data coverage you have for this input - with scores of 1.0 identify exact coverage and 0.0 representing an isolated datapoint. When you see lower scores, you may want to add additional memories to ensure high accuracy.
It’s important to note both of these metrics are relative to the task you’re asking the model to complete, so you should look at them in relation to other predictions. We’ve found that confidence scores are often lower, despite still seeing high accuracy, when tasks demand more nuanced classification (jailbreak detection, brand voice adherence, sentiment classification, etc) or when you have a pocket of sparse memories.
Once contextualized, confidence and anomaly metrics can be used to intelligently steer your model - especially by adding new memories when a model begins to encounter unfamiliar queries.
Inspect a Prediction
By selecting the “Inspect” button, you can examine the model’s reasoning behind an individual prediction and take various actions to steer a model’s behavior.
While inspecting a specific prediction, you will see the specific memories used, as well as their level of influence, the similarity to the prediction itself, ambiguity around that memory, and the confidence score. While auditing this memory, you can take the following actions:
Flag a Prediction as Correct or Incorrect: Marking a prediction as correct or incorrect creates powerful feedback. If a prediction is incorrect, you are likely encountering one of the following scenarios:
- Mislabeled memories have been accessed when making the prediction. You can correct these by adjusting the labels directly within this page.
- Not enough memories for this type of input. Adding the input query (along with other synthetic examples) to the memoryset should begin improving this gap.
When you mark a prediction as incorrect, Orca will prompt you to begin managing your memoryset by adding this (and potentially additional memories). We’ll discuss this in more detail in the Memory Management section below.
Add this example: In addition to leveraging the memory management flow when the model creates an incorrect prediction, Orca recommends adding this example to your memoryset using the button in the top right corner when you see a correct, but lower confidence prediction. These lower confidence metrics suggest you may have sparser memories, so adding additional memories will increase future accuracy and confidence.
SmartExplain: Leverage Orca’s “SmartExplain” functionality to understand what underlying reasoning drove the model to make its prediction. This functionality relies on the previous descriptions you entered about the model and memoryset, so if you’re unhappy with current explanations, you may want to enter a more detailed and thorough description.
Accessed vs. Current Memories: You can toggle back and forth between the historical “accessed” memories that were used when making the prediction and the current status of those memories. By retaining the historic memories, you can make updates to your memorysets while maintaining a full audit trail.
Memory Management for Classification Models#
Memory management is the principle way you steer models and drive their performance via Orca. Memory management primarily occurs when reviewing existing predictions or looking at advanced metrics to guide improvements to your model.
Important
Any changes you make to a memoryset will impact all models using that memoryset.
Add New Memories
When reviewing your model predictions - either from test scenarios you completed or from production data- you may find new examples that could strengthen your memoryset. These may be predictions that:
- The model got incorrect. Adding these correct predictions should improve performance on subsequent similar predictions.
- The model got correct, but with low confidence, high anomaly scores. Adding these memories creates greater density in areas where your memory map has sparser coverage.
To turn these predictions into memories, navigate to that specific prediction. Once you are looking at that screen, you can select “Add to Memoryset” in the top right corner.
By clicking this, you will be asked to select a label for the example. The dropdown will default to the predicted label unless it has been marked as incorrect, then it will default to the provided corrected label. After clicking “Add Memory”, the memory is inserted into your memoryset. Please note that this update will impact all predictions going forward across all users using this memoryset.
Adding Synthetic Memories
In large memorysets, a single memory may have limited impact on future predictions. To help adjust your model’s predictions, Orca offers synthetic memory creation to bolster this new examples’ impact.
When you add a new memory to the memoryset, Orca offers you the option to have Orca’s memory management agent create additional synthetic memories. These synthetic memories will mirror the existing structure of your memorysets, but reflect the new label. You will have the ability to review these memories before committing them to a memoryset.
Adding these synthetic memories (even temporarily while you gather more data) will allow your model to adjust faster and more accurately for emerging use cases.
Important
Using Orca’s agentic features depends on Orca having run the correct analysis. If you get error messages, please re-run the memoryset analysis.
Edit a Memory
You may also want to adjust single memories. Adjusting a single memory could stem from mislabeled data that got through the cleaning phase, incorrect predictions, or updated underlying criteria resulting in the need to update a memory’s label.
You can adjust labels after a memory gets accessed to make a prediction. After opening the prediction, you can click the label for a specific memory and change that memory’s label. Any existing labels in the memoryset will be available to you as well.
Cascading Edits
Changing a single memory provides a valuable signal to Orca and helps to identify other suggested edits to similar memories that can effectively steer your model. Orca calls this the “Cascading Edits” workflow.
After updating a memory’s label, the system will analyze the memoryset for other similar edits and, if found, you will see a “Show Suggested Edits” button. After clicking that button, Orca will open a window that will show additional changes based on your latest update to the model. You can approve the changes in the dialog or open a full page view to make updates.
In some cases, you may find that you do not agree with suggested edits. This will most often happen for memories that represent the cutoff point between two different classes or if examples may have different subjective interpretations across reviewers. If you don’t believe these suggested edits will improve your models’ performance, you can simply click Close or return to the model.
Delete a Memory
As you examine a model’s predictions, you may find that certain memories are no longer helpful. Memories become irrelevant because of changing business logic, the need to adapt the memoryset for new customers, or from organic data drift. If you observe an unwanted or unhelpful memory while auditing predictions, you can click the trash icon on the left side of the row to remove it. Deleting this memory removes it from the memoryset, so this change impacts every model leveraging that dataset.
Memoryset Metrics (Beta)
When you are reviewing a specific memoryset, you may have access to a Beta feature we call Memoryset Metrics. This feature is a new capability where Orca can analyze your memoryset to understand the entire memory map and create specific empirical measurements you can use to improve your memoryset.
If you have this Beta enabled, you will see a “Data Copilot” button when you are visiting a specific memoryset.
Selecting this button will bring you to a Metrics page. Orca will automatically run this analysis when you create the memoryset, so this page lets you inspect detailed results and re-run the analyses.
By selecting the “Run Analysis” button, you can select the metrics that you would like to run. Many of the results of this analysis are currently only available through the OrcaSDK. The available metrics to run are:
- Duplicate Analysis: Identifies exact or highly-similar matches between memories to help users quickly spot and address redundancies in a memoryset.
- Neighbor Analysis: Measures the distance a datapoint is from its nearest neighbors to spot anomalies or areas with sub-optimal memory saturation.
- Label Analysis: By looking at a memory’s nearest neighbors, this analysis can detect the memories that are most likely mislabeled. These metrics also power the “Mislabeled Memories” workflow that we’ll discuss below.
- Projection Analysis: Provides 2D visual projections of the memoryset.
- Cluster Analysis: Looks at the entire memoryset to identify clusters of similar memories, as well as measure the number of memories in that cluster and the total number of clusters. This analysis can help you identify new subcategories, as well as memoryset imbalances or ambiguous classifications.
- Class Label Analysis: Examines and explains what’s included in each class and identifies potential areas of overlap with other classes.
Mislabeled Memories
Once you have run an analysis, you can leverage the “Mislabeled Memories” workflow. Within the OrcaApp, Orca will help you identify potentially mislabeled memories and fix them. From the “Metrics” page, you can select the “Mislabeled Memories” button.
Once you’ve opened that screen, you will see recommendations based on memories that have low confidence and are surrounded by neighbors that are confident in a different label. Based on this analysis, we typically recommend the following actions:
- When you agree with a suggested edit, select those memories and click the “Relabel Selected Memories” button.
- If you disagree with a suggestion, take no action.
Because these capabilities are built on mathematical correlations, Orca may surface examples where you want to take an action, but that action is different than updating to the recommended label:
- Memory has an incorrect label, but you don’t agree with the suggested edit
- Corrected labeled anomalies that you don’t expect to happen again, so you want to delete that memory from the memoryset.
Currently, the easiest way to correct this specific memory is to run this memory through the model as a prediction. Due to the high similarity, the model will leverage the memory you are looking for, and you can take any of the available editing actions as you look at the prediction.
Regression Model with Orca#
Regression models are a new addition for Orca that are still under development and some capabilities are not available in the UI yet. For regression models, you can currently:
- Build a regression model from a scored memoryset
- Test predictions to get a scored value
- Manually manage memorysets to steer performance
Orca is still developing agentic memory-management workflows like SmartExplain, Cascading Edits, and memoryset analysis for scored memorysets.
Improving Performance#
When models don’t hit the accuracy levels that you’re expecting, you have several tools at your disposal to improve the model’s performance and Orca’s ability to help you tune the memoryset.
One approach is making structural changes to the memories within the memoryset. These are made outside Orca. A few techniques we’ve used in the past include:
- Using synthetic data to augment an existing datasource once we identify areas of sparse data
- Adjust the information included in the datasource (e.g. for an internal model that classifies our expenses to budget categories, we’ve found including or excluding the date could subtly impact which memories were accessed at inference)
There are also several systemic approaches you can take to adjust your memoryset and model’s parameters. All of these approaches require some testing, as they’re not guaranteed to boost performance and may lead to lower performance in some scenarios.
Agentic Workflows
SmartExplain leverages the descriptions you’ve included for both your memoryset and your model. These descriptions help create the prompts for agentic workflows used in SmartExplain and data tuning. If you find that SmartExplain is not providing logical or useful suggestions, adding more details to the memoryset and model descriptions may be necessary.
Missing Description
If the memoryset or model does not have a description, you will get an error message when you try to use SmartExplain. Adding the missing description will resolve this error.
To update a memoryset’s description, navigate to the Memorysets page, open the memoryset you would like to update, and select the “Edit” icon located next to the memoryset’s name.
Select the “Edit” icon located next to the memoryset’s name to open the editing window. You will see the existing description in the section labeled description and you can edit it within that flow. If no description is entered, you can enter a new description into the model.
To update a model’s description, navigate to the Models page, select the “Go to Model” icon located on the right side of the screen for the model you would like to update.
Once you have opened the specific model, select the “Edit Button” located on the right side of the screen across from “Model Details. Selecting that button will open the editing window. You will see the existing description in the section labeled “description” and you can edit it within that flow. If no description is entered, you can enter a new description into the model.
Select a different embedding model
Some embedding models work better for different types of underlying data. Identifying the highest performing model usually requires additional empirical evidence.
You can evaluate each embedding model against your data from the “Evaluate Embedding Models” page which is linked on the “Datasource Details” page. Additionally, you can run the clustering analysis on two memorysets with the same data and different embeddings to see which one is more clearly delineated.
In some cases, finetuning an embedding model for your specific data and using that can boost a model’s accuracy by a small amount. By visiting the “Embedding” tab in the menu, you will see the available embedding models and can click the icon to begin the finetuning process. You simply name the new embedding model and select an existing datasource or memoryset and Orca will automatically finetune this embedding model based on the selected data.
Adjust Advanced Settings
As you get more comfortable with Orca, you may want to adjust the default settings when creating your models. Changing these settings often has minimal impacts on the model’s actual performance compared to the defaults, so we really recommend making changes to the memories to see if you can increase a model/memoryset combination’s accuracy instead.
To use these settings when optimizing your model, please use the following guidance:
-
Min memory similarity has a default setting of 0. Increasing this criteria will lead to some memories, when not highly similar, getting ignored. This can be a helpful property when you have highly similar, but still distinct, classes, but it can come at an accuracy penalty as well.
-
Number of memories to look up has a default setting of 9, which is a nice balance between accuracy, inference times and steerability. As you increase the number of memories used in a lookup, you often increase the accuracy of a prediction (especially if it picks up an outlier memory), but adjusting outputs often requires you to tinker with many different memories.
-
Weigh memories defaults to “On” in a standard set-up, which we’ve found often boosts accuracy, especially when you have multiple classes. Turning weighing memories off will make all datapoints equal in their influence. Typically, this lowers your accuracy, but could boost performance in some edge cases.
Settings#
In the bottom left corner of the OrcaApp, you can open your administrative workflows.
Organization
If you have sufficient permissions, you can invite or remove users. You can also adjust an individual’s permissions. For more information, follow the Account How To Guide
Settings
In the Settings tab, you can adjust your own individual settings, including:
- Changing your name and email address
- Manage the workspaces you belong to
- Toggle between “Light” and “Dark” mode